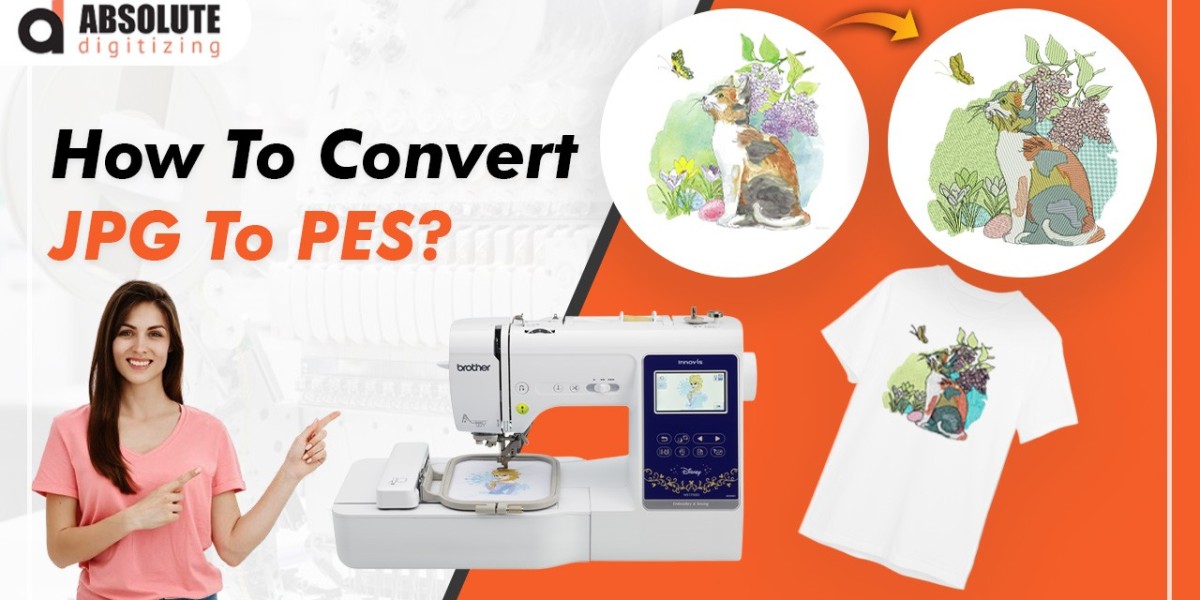
Have you ever found a perfect image and thought, "This would look amazing embroidered!"? Whether it's a logo, a favorite quote, or a custom design, turning a JPG into an embroidered piece is totally doable—even if you're just starting out. The key is converting that JPG into a PES file, the format used by Brother embroidery machines (and some others).
This guide will walk you through the entire process, on how to convert JPG to PES embroidery file from picking the right image to stitching your final design. No fancy software or expensive digitizing services needed—just free tools and a little patience.
Why Convert JPG to PES?
First, why PES? If you own a Brother, Babylock, or some Singer embroidery machines, they read .PES files natively. Converting your image to this format ensures smooth stitching without compatibility issues.
But here’s the catch: Embroidery machines don’t understand regular image files like JPGs or PNGs. They need instructions on where to stitch, what color to use, and how dense the stitches should be. That’s where digitizing comes in.
What You’ll Need
Before diving in, gather these:
- A JPG image (simple designs work best)
- Free digitizing software (we’ll cover options below)
- An embroidery machine (compatible with PES files)
- Basic stabilizer and fabric (for testing)
Step 1: Choose the Right JPG Image
Not all images embroider well. The best candidates have:
✔ Clear outlines (no fuzzy edges)
✔ Limited colors (3-5 colors max for beginners)
✔ Bold, simple shapes (avoid tiny details)
Example: A solid black logo on a white background stitches better than a shaded portrait.
If your image is too complex, simplify it first using a free tool like GIMP or Canva. Remove backgrounds, increase contrast, and reduce colors if needed.
Step 2: Convert JPG to PES (Free Methods)
You have a few free (or low-cost) options to digitize your JPG into a PES file.
Option 1: Ink/Stitch (Free + Most Control)
Ink/Stitch is a free plugin for Inkscape (a free vector editor). It’s perfect for manual digitizing.
How to Use It:
- Download Inkscape (free at inkscape.org)
- Install the Ink/Stitch extension (follow their setup guide)
- Import your JPG into Inkscape
- Trace the image (Path > Trace Bitmap) to create vector paths
- Assign stitch types (Satin for outlines, Fill for solid areas)
- Export as PES (Extensions > Ink/Stitch > Export)
Pros: Free, customizable.
Cons: Steeper learning curve.
Option 2: Online Converters (Quick but Limited)
If you want a faster (but less precise) method, try:
- StitchFiddle (basic auto-digitizing)
- MyEditor (simple JPG-to-PES conversion)
Just upload your JPG, tweak settings if possible, and download the PES file.
Pros: No software needed.
Cons: Less control, may need manual fixes.
Option 3: SewArt Free Trial (Auto-Digitizing)
SewArt offers a free trial with auto-digitizing features. It’s user-friendly but limits saving in the trial version.
- Download SewArt (from SewWhat?)
- Open your JPG and run the auto-digitizer
- Adjust stitch density/underlay if needed
- Export as PES
Pros: Easier than manual digitizing.
Cons: Watermarks in free version.
Step 3: Adjust the Design (For Better Results)
Auto-digitized files often need tweaks. Check for:
- Gaps in stitching (increase density)
- Puckering (reduce density or add underlay)
- Jump stitches (trim manually or optimize path)
In Ink/Stitch, you can manually edit stitch paths. In online tools, you may need to accept minor flaws or redigitize.
Step 4: Test Before Stitching
Always test your PES file on scrap fabric! Look for:
- Thread breaks (too many stitches in one spot)
- Misaligned colors (recheck color order in the file)
- Fabric distortion (use stabilizer or adjust tension)
Step 5: Stitch Your Design
Once happy with the test:
- Load the PES file onto your machine (via USB or direct transfer)
- Hoop fabric with stabilizer
- Start stitching!
Troubleshooting Common Issues
Problem: Design Looks Pixelated
- Fix: Start with a higher-resolution JPG or smooth edges in Inkscape.
Problem: Thread Keeps Breaking
- Fix: Reduce stitch density or use a stronger thread.
Problem: Fabric Puckers
- Fix: Add more stabilizer or decrease stitch pull compensation.
Free vs. Paid Digitizing
While free tools work for simple designs, paid software like Hatch or Wilcom offers:
- Better auto-digitizing
- More file format options
- Advanced editing tools
For hobbyists, free options are fine. For businesses, investing in better software saves time long-term.
Final Tips for Beginners
- Start simple – Convert a basic shape before tackling complex art.
- Use stabilizer – Prevents fabric from shifting.
- Record your edits – Note what works for future projects.
Ready to Embroider Your JPG?
Now you know how to turn any JPG into a PES file for free! It might take a few tries, but once you get the hang of it, you’ll unlock endless embroidery possibilities.
Your turn: Pick a simple image, try digitizing it, and see how it stitches out. Happy embroidering!